
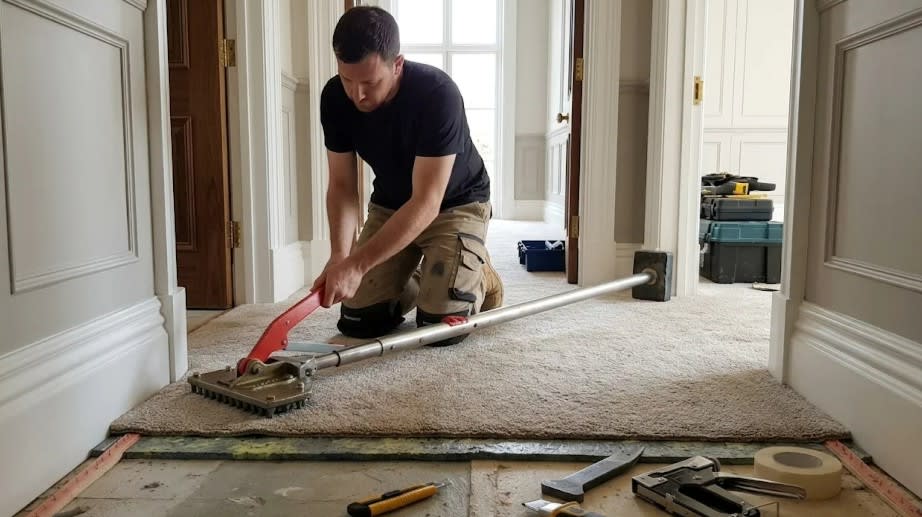
Laying carpet yourself is absolutely doable in a bedroom, a hallway or a small sleepout. It gets a lot harder the moment you add stairs, loop pile, patterns or a big open-plan living area. Knowing which job you've got in front of you is honestly the most important decision you'll make.
Here's the full process the way we'd do it on site, with the tools and materials you can actually get hold of in New Zealand, plus the bits that trip people up — gripper gaps, stretching, doorway joins and moisture in the subfloor.
Decide first: is this a DIY job or a job for an installer?
Carpet installation is a trade for a reason. The cutting is unforgiving — you get one go — and stretching properly takes a feel you build over hundreds of rooms. That said, plenty of handy homeowners pull off a tidy single-room install.
Good first DIY jobs
- A square or rectangular bedroom with no seams needed (most broadloom carpet comes 3.66m wide, so rooms under that width can often be done in one piece).
- A sleepout, caravan, office or rumpus room where a slightly imperfect edge won't bother you.
- Cut pile carpet — plush, twist or textured. Far more forgiving than loop.
Leave these to a pro
- Stairs. Waterfall vs cap-and-band, tight stringers, winders — this is where DIY jobs look DIY.
- Loop pile. Cutting loop requires a row cutter and cutting between rows; a normal trimmer will pull loops and fray the edge.
- Patterned carpet. Pattern match across a seam is genuinely difficult, and pattern repeat adds waste.
- Large open-plan areas with multiple seams. A bad seam is visible forever.
One more thing worth checking before you start: many carpet manufacturers' warranties in NZ require installation to the relevant standard by a qualified installer. If you DIY and the carpet later delaminates, ripples or the seams open, you may have no comeback. Read the warranty wording before you cut.
Measuring and ordering carpet in New Zealand
Carpet here is sold by the broadloom metre off a 3.66m wide roll (some ranges come 4m). You pay for the full width, not just the area you use — so a 3m x 4m room still takes 3.66m x 4m of roll.
Measure the longest and widest points of the room, including into doorways and wardrobe recesses, then add 75–100mm to each dimension for trimming. Always draw a plan and mark pile direction: all pieces must run the same way or they'll look like different colours.
Rough budget ranges to work with:
- Carpet: around $40–$70 per broadloom metre for entry-level solution-dyed nylon, $80–$150+ for good wool or premium nylon ranges.
- Underlay: roughly $12–$30 per square metre depending on grade (8mm rubber crumb or foam is standard residential; 10–11mm feels plush but needs the right gripper gap).
- Gripper (smoothedge): a few dollars per lineal metre.
- Professional install: commonly $15–$30 per square metre, plus uplift and disposal of the old carpet.
Do the sums honestly. Once you've hired a power stretcher and bought a knee kicker, trimmer, blades, gripper and staples, the DIY saving on one small room can be slim.
Tools and materials you'll need
- Knee kicker — for positioning and small areas.
- Power stretcher — hireable from most NZ hire centres. Don't skip it on anything bigger than a small bedroom.
- Carpet trimmer / wall trimmer and a utility knife with plenty of spare blades. Blunt blades cause ragged cuts and slips.
- Bolster (tucking tool) and a stair tool.
- Hammer, hacksaw or gripper shears for cutting smoothedge.
- Hammer tacker or staple gun for underlay on timber floors; spray contact adhesive or double-sided tape for concrete.
- Seaming iron and seam tape if you're joining pieces.
- Doorway trims — Z-bar, carpet-to-tile or carpet-to-vinyl dual bars.
- Safety gear: knee pads (non-negotiable), gloves, dust mask, eye protection.
Step 1: Lift the old carpet and check the subfloor
Cut the old carpet into strips about 500mm wide with a utility knife, roll them, and tape them. Lift the old underlay and scrape up the staples or dried adhesive. Pull the old gripper too if it's rusted, loose or the wrong size for your new carpet thickness.
Safety note for older homes: if your place was built or renovated before the mid-1990s and there's old vinyl, lino or black adhesive under the carpet, stop. Those materials can contain asbestos. Don't sand, grind or break them up — get it tested or ask a licensed removalist.
With the floor bare, check it properly:
- Timber or particleboard: punch down proud nails, re-screw squeaky sheets into joists, sand down any lipping at sheet joins.
- Concrete slab: look for dampness. A quick field check is to tape a half-metre square of plastic sheet down tight overnight — condensation underneath means moisture is coming through and you need a moisture barrier or a proper assessment first. Carpet over a damp slab will smell and the underlay will break down.
- Old villas and bungalows: check subfloor ventilation under the house. Poor airflow plus a damp site is the number one cause of musty carpet in NZ.
- Fill low spots and grind off high spots. Every lump telegraphs straight through new carpet.
Vacuum thoroughly. Any grit left behind works its way into the underlay.
Step 2: Fix the gripper (smoothedge)
Gripper goes around the full perimeter of the room with the pins angled towards the wall. The gap between the gripper and the skirting should be roughly two-thirds of the carpet's thickness — usually 6–10mm. Too tight and you can't tuck; too wide and the carpet sags into the gully.
On timber, nail it down with the pre-set nails. On concrete, use masonry nails or gripper with hardened pins, and add construction adhesive in anything crumbly. Cut gripper with a hacksaw or shears — never leave a sharp end sticking into a doorway.
Leave a gap at doorways where a trim will go, and keep gripper away from fireplace hearths and floor vents.
Step 3: Lay the underlay
Butt the underlay sheets edge to edge (never overlap) and cut them so they finish right at the inside edge of the gripper, not over the top of it. Staple at roughly 150mm centres around the perimeter and along the seams on timber floors. On concrete, use spray adhesive or double-sided tape around the perimeter and at joins.
Tape the seams with underlay tape so nothing shifts while you're stretching. If you have underfloor heating, check that your underlay is rated for it — many standard foams aren't, and the wrong product will insulate the heat away or break down.
Step 4: Rough cut and position the carpet
Bring the carpet inside a day before if you can, especially in winter — cold carpet is stiff and hard to work. Roll it out in a clear space (garage or lawn, kept clean and dry), mark your cuts on the back, and cut from the backing side with a sharp knife against a straightedge.
Carry the piece in and lay it with 50–75mm climbing up each wall. Make relief cuts at corners and into doorways so it lies flat. If you need a seam, line it up now, trim both edges straight, run the seam tape underneath and bond it with a heated seaming iron — working slowly and pressing the pile together behind the iron as you go.
Step 5: Stretch the carpet
This is the step DIYers skip, and it's the reason wrinkles show up six months later. Carpet must be stretched, not just laid.
Start by hooking one short wall onto the gripper with the knee kicker. Then use the power stretcher braced against that wall to stretch across the room, hooking the opposite edge onto the gripper as you go. Work around the room — long wall, then the opposite long wall, then the remaining ends — keeping tension even. Use the knee kicker to tidy corners and short runs.
Protect your knees. A knee kicker is meant to be bumped with the padded part of your thigh just above the knee, not slammed with the kneecap. People genuinely injure themselves doing this wrong.
Step 6: Trim, tuck and finish the edges
With the carpet hooked and tensioned, trim the excess with a wall trimmer set to the carpet thickness, leaving about 5–8mm to tuck. Then use the bolster to push that edge down into the gully between the gripper and the skirting. Tap it, don't force it — you want a clean, straight line with no rippling at the wall.
At doorways, fit your trim: a Z-bar or dual bar to join to vinyl or tile, and a carpet-to-carpet bar where two rooms meet. Cut the carpet to finish under the centre of the door when it's closed so you don't see a join from either room.
Check door clearances. New carpet plus new underlay is often thicker than what came out, and interior doors may need 5–10mm taken off the bottom.
Step 7: Clean up and settle in
Vacuum thoroughly — new carpet sheds loose fibre for the first few weeks, which is normal, especially with wool. Keep the room ventilated for a few days; that new-carpet smell dissipates quickly with airflow.
Watch the floor over the next month. Small wrinkles usually mean the stretch wasn't tight enough and can be re-stretched. Edges lifting off the gripper point to a gripper gap or nailing problem. Sort either one early, before foot traffic wears a crease into the pile.
Common DIY mistakes to avoid
- Not stretching. Laying carpet loose and tucking it looks fine on day one and terrible by winter.
- Mixing pile direction. Two pieces facing opposite ways will look like two different carpets.
- Reusing worn-out underlay. It's the cheapest part of the job and it does most of the work for comfort and wear.
- Measuring without allowance. You can't add carpet back on. Always order with trim allowance and account for the 3.66m roll width.
- Ignoring moisture. Damp slabs and poorly ventilated subfloors ruin carpet faster than anything else in NZ homes.
If you're doing one straightforward bedroom with a cut pile carpet, take your time, hire a power stretcher, and you'll get a result you're happy with. If stairs, loops, patterns or multiple seams are involved, get a measure and quote first — the installed price often isn't far off the DIY cost once tool hire and the risk of a ruined cut are factored in. Either way, bring your room dimensions and we can tell you exactly how much carpet you'll need off the roll.


